

I know replacing a phone battery can be hard and scary. You might worry about damage or breaking parts.
Replacing the battery in your Phonix 3 can bring your phone back to life. You will know the right tools, steps, risks, and how to make sure the new battery is a good fit.
Let’s walk through each part in a clear and simple way so you can do this with more confidence.
What tools fit Phonix 3 battery replacement?
Your phone is just a few screws and parts away from a new battery. But only correct tools can keep parts safe.
To replace the battery in your Phonix 3, you will need tools that match the screw types, pry open the phone gently, and pull the battery without strain. Most standard phone repair kits have all you need.

You can’t just use random tools. Small screws, tight joints, and fragile cables need precise tools. If you pick the wrong tool, you can strip screws, crack plastic, or hurt delicate connectors. This is why knowing the right set of tools matters.
The Basic Toolkit
Most battery replacements need the same basic tools. Here is a table of the most common tools and why you need them:
| Tool | Purpose |
|---|---|
| Phillips Screwdriver | Remove the small screws that hold the phone together |
| Plastic Pry Tools | Open the phone without scratching or breaking |
| Suction Cup | Lift the screen safely |
| Tweezers | Handle small screws and cables |
| Spudger | Release tightly seated components |
| Anti‑static Wrist Strap | Prevent static damage to phone parts |
All these tools help you open the phone, remove parts safely, and handle internal pieces without damage.
Why Each Tool Matters
Each part of the phone fits together in a certain way. A screwdriver makes screws turn, but if it is the wrong size, the screw head gets damaged. That can make the phone harder to open next time.
Plastic pry tools use a soft edge to separate parts. Metal tools can slip and scratch, which is why plastic is better. That also helps protect the screen and frame.
A suction cup helps you lift the screen without bending it. The screen is thin and glass, so it needs gentle force. The suction cup spreads that force more evenly.
Tweezers are helpful when parts are too small for your fingers. The battery connector and battery tabs are tiny and hard to reach with bare hands.
Spudgers are flat, pointed tools that help you pop connectors off the board. They help you apply force in the right spots without bending anything.
Finally, the anti‑static wrist strap keeps electric charges from building up in your body. Static can fry chips and connections inside the phone. This might not stop a big mistake, but it reduces one more risk.
Where to Get These Tools
Phone repair kits that include all these tools are inexpensive and easy to find online. You can buy a set that fits most phone models. Some sets even come with extra parts like backup screws or adhesive strips.
Before starting, check that you have all these tools laid out on a clean surface.
Why follow Phonix 3 teardown steps?
Not all phones are the same. The Phonix 3 has specific internal layout, screw types, and cable structures.
Following the official teardown steps helps you open your Phonix 3 in the right order, protect internal cables, and keep components in good condition. Skipping steps can cost you time and damage the phone.
You might think you can skip or improvise steps. That often leads to snapped cables or cracked screens. Teardown guides show how to disconnect parts safely before you lift something.
What Teardown Guides Do
Most teardown steps will show you how to do these things:
- Remove external screws
- Open the back cover without bending
- Disconnect cables in the right order
- Remove the old battery safely
- Install the replacement battery
- Close the phone and test it
Following these in order matters because many parts are connected. If you take out a screw before releasing a cable, you might pull on the cable and snap it. That can make parts stop working.
Example Teardown Sequence
Here is a simple list of the type of steps you will see in a teardown guide:
- Power off the phone
- Remove the SIM tray
- Unscrew screws from the back cover
- Use a pry tool and suction cup to open the back
- Disconnect the battery cable from the board
- Lift battery with pull tab or pry gently
- Place the new battery in without bending it
- Reconnect battery cable
- Reassemble screws and cover
This type of order protects the board and cables. The board is the heart of the phone, and cables connect the screen, buttons, and battery to it.
What Can Go Wrong if You Don’t Follow Steps
If you skip order and go fast, here are common failures:
- Screen crack due to bending while opening
- Ribbon cable tear when lifting parts
- Battery swelling if lifted improperly
- Misplaced screws that cause short circuits
- Frame damage that makes the phone weaker
Following a teardown step by step is not just slow caution. It is necessary to make sure everything goes back like it came out.
Which risks occur during removal?
Battery replacement is not like changing a battery in a TV remote. Phones are packed with parts in tight spaces.
Removing the battery from your Phonix 3 has risks such as puncturing the battery, breaking connectors, and harming the screen or board. Recognizing these risks helps you work slowly and reduce mistakes.
Risks are real, and they matter. Many issues happen because people rush or do not understand what they touch.
Battery Damage
Lithium‑ion batteries can be dangerous if punctured or bent. A puncture can cause heat, swelling, or chemical leakage. If you use metal tools and slip, you could hit the battery and make it unsafe.
The battery also has glue holding it to the frame. If you pull too hard, the battery bends and its seal breaks. This can shorten its life even if nothing seems broken.
Cable and Connector Breaks
Phones use ribbon cables to connect the screen, buttons, and battery to the motherboard. These cables are thin and fragile. Pulling a cable without checking its connector can tear it.
If a cable tears, it might stop the screen from working, or kill the connection to buttons or the camera.
Here is a table that shows common issues and what causes them:
| Risk | What Causes It |
|---|---|
| Battery puncture | Using metal tools or prying too hard |
| Cable tear | Pulling before disconnecting connectors |
| Screen damage | Bending screen while opening |
| Screw damage | Wrong screwdriver size |
| Static damage | No anti‑static protection |
Board and Chip Risks
Inside your phone is a printed circuit board (PCB). Chips on this board control everything. Static shock from your body can damage them. That’s why you use an anti‑static wrist strap.
Also, pressure on the board can break tiny solder joints. That makes parts stop working, like the camera, volume buttons, or Wi‑Fi.
Adhesive and Glue
Many batteries attach with strong glue. To remove them, you slide a thin pry tool under the battery. If you rush, the tool can slip and hit other parts.
Some guides suggest heating the back to soften adhesive. Heat must be low and even. Too much heat can warp or damage parts.
This is why risks are serious and worth avoiding with careful steps.
How do you verify new battery compatibility?
You cannot just pick any battery. Phones need batteries with specific size, voltage, and connector type.
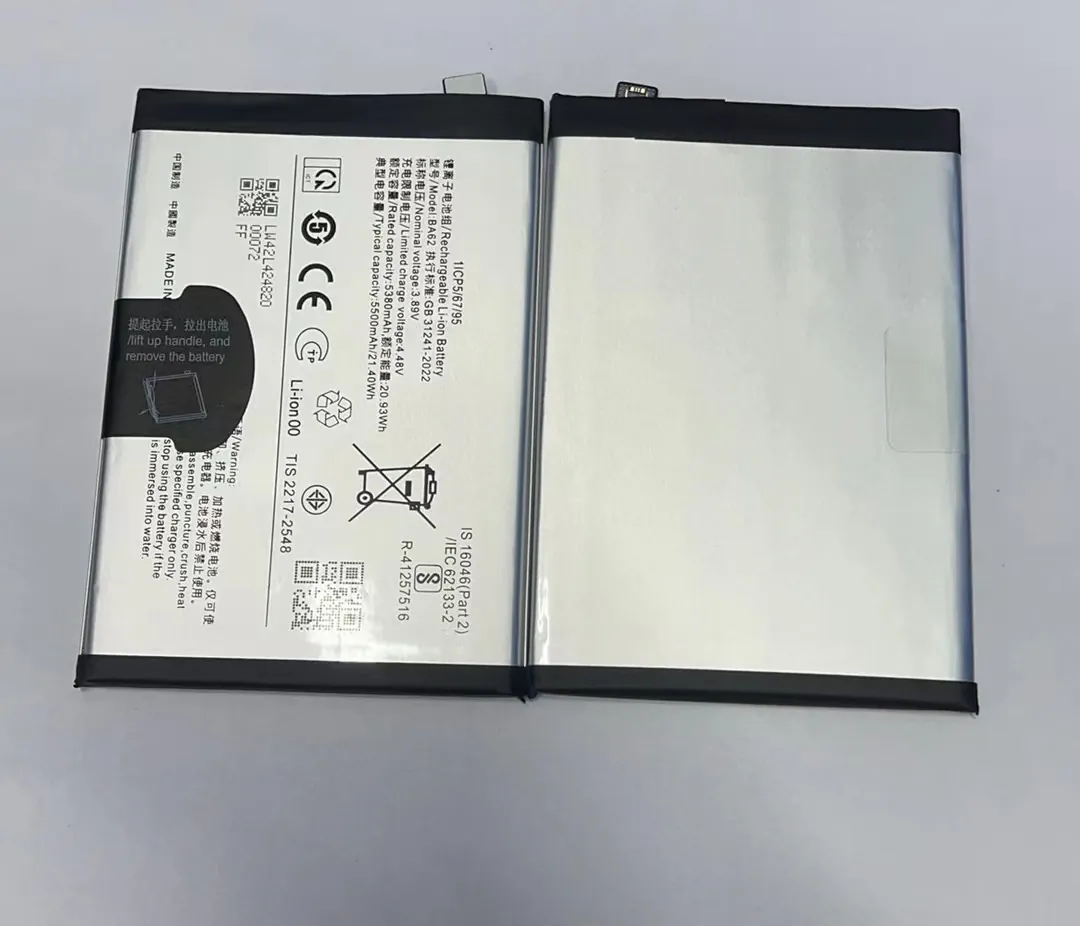
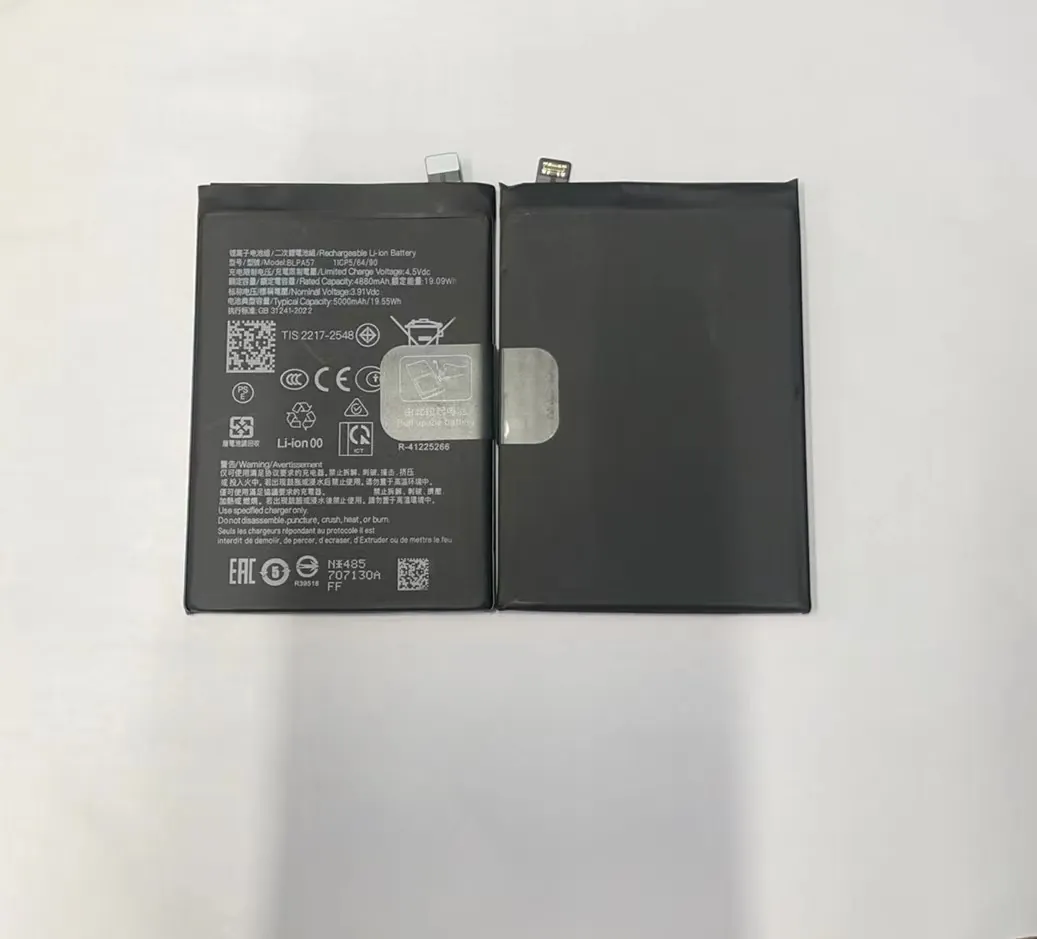
To verify battery compatibility with your Phonix 3, check the battery model number, connector shape, voltage rating, and size. Using a battery not made for your model can harm phone function and battery life.

Compatibility means the battery matches all the phone’s needs. It is more than size. A battery that is slightly different might not charge, might overheat, or might drain fast.
What to Look For
Here are the main things to check when picking a new battery:
- Model number
- Voltage rating
- Capacity (mAh)
- Connector shape and pins
- Physical size and thickness
Here is a table to make this clearer:
| Specification | Why It Matters |
|---|---|
| Model number | Exact fit and correct wiring |
| Voltage | Phone needs correct voltage for safe charging |
| Capacity | Higher capacity lasts longer but must fit |
| Connector | Must match phone socket |
| Size | Must fit within battery compartment |
If the model number does not match, the phone might show errors or not start at all.
Where to Find Battery Info
You can find the battery information:
- On the old battery label
- In official phone specs online
- From the seller of replacement battery
The old battery label usually shows all needed info. Take a picture or copy it before removal.
You will see something like “3.85V” or “4000mAh.” These values must match the new battery.
Why Voltage Must Match
Voltage tells how much electrical force the battery gives. If the new battery has lower voltage, phone may not start. If higher, phone parts can overheat.
Manufacturers design phones for the exact voltage range. Batteries over or under this range can cause issues.
Capacity Differences
Capacity (mAh) tells how long the phone runs on a charge. Higher capacity means longer run time. But it must also fit physically.
A larger battery might not fit or might put pressure on internal parts. Always choose a battery that fits and has equal or slightly higher capacity within phone specs.
Connector Shape and Pins
Phone batteries connect to the motherboard with a small plug. Each phone model has its own shape. If the pins do not match, power won’t flow.
For the Phonix 3, the connector shape and pin layout must be identical. A mismatch can short circuits or cause failure to power on.
Supplier and Quality
Buy from trusted sellers. Poor quality batteries can:
- Swell
- Drain fast
- Overheat
- Fail early
Look for certification marks and good reviews. Cheapest is not always best. A good battery lasts longer and charges safely.
Testing Before Full Assembly
Before putting the phone back together, test the new battery. Connect it, power the phone, and see if it charges and runs normally. This step saves time if something is wrong.
If it does not power on, check the connector, match specs, and test again.
Conclusion
Replacing the battery in your Phonix 3 phone can restore performance and extend life. The right tools, steps, and careful removal reduce risks. Always make sure the new battery matches specs and test it before final assembly. With patience and correct process, you can do this safely and successfully.
